 A number of different communication modules for use with the Android I/O board have been introduced in various articles for the board. These modules have used WiFi, Bluetooth or USB. However, there is one module for the Android I/O board that's missing, which uses one of the most popular communications standards: Ethernet. This article describes a module that enables the Android I/O board to be connected to a wired Ethernet network.
The USR-TCP232-T module [1] is one of the cheapest modules around that can convert data from an Ethernet connection into serial data, which can be processed by the Android I/O board. The advantage of an Ethernet module is that it doesn't use radio waves for the connection, which means that any interference in that area is avoided.
The USR-TCP232-T module can operate in one of four modes [2]. The main modes are a server mode and a client mode. In server mode the app has to create the connection with the USR-TCP232-T module. In client mode the module works the other way round: the module takes the initiative to create a connection to the app. For the Android I/O board we have to configure the USR-TCP232-T as a server: The standard software for the apps always takes the initiative to create the connection. In both the server mode and client mode you can choose between a UDP and TCP connection. With a UDP connection the data is transmitted without any checks taking place that the data has been received successfully. With a TCP connection there are checks to see that the data has been received (and in the correct order); if necessary, the data will be retransmitted. The standard software for the Android I/O board uses TCP. For the Android I/O board we therefore use the 'TCP server' mode for the USR-TCP232-T module.
The USR-TCP232-T module doesn't support DHCP. With DHCP, the router allocates IP addresses to the devices on the IP network, such as PCs or mobile phones. With the USR-TCP232-T module we can only set up a fixed (static) IP address. This address should be within the IP range of the (private) network that the module is connected to.
If we want to connect a USR-TCP232-T module to the Android I/O board, we must first take care of two things. First of all, we need to make a connection cable to connect the module to the Android I/O board. We then have to set up the serial connection and the IP address of the USR-TCP232-T module.
Connecting to the Android I/O board
There is no single connector on the Android I/O board that exactly matches the one on the USR-TCP232-T module. However, all connectors do have the links we need: the supply voltage (3.3 V and GND) and the serial data (TX and RX). The USR-TCP232-T module also has a configuration pin. This is only required when we want to configure the module via the serial port. Since we're going to configure the module via the Ethernet network, this pin isn't really required.
As we saw earlier, we can use any of the connectors on the board. The author decided to use the connector for the ESP8266 (MOD4). There are two ways in which to make the connector: via a ribbon cable or using a (double-sided) experimenter's board with the connectors for the USR-TCP232-T module and the MOD4-connector mounted on it. Figure 1 shows the wiring diagram. Note that the two pins either side of the Ethernet connector on the USR-TCP232-T module are not electrically connected to any of the parts on the module; they are there to provide mechanical stability to the module.
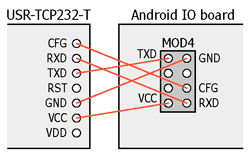
Figure 1. The wiring diagram for the two connectors on the cable linking the USR-TCP232-T module to the Android I/O board
Setting up the USR-TCP232-T
To set up the USR-TCP232-T, we can download a Windows program from the manufacturer's website [3]. This program sends a special UDP packet containing all parameters to the module in order to change its settings [2].
Below is a comprehensive set of instructions on how to set up the USR-TCP232-T (also see Figure 2). But first you must determine which addresses you can use in your network and what its subnet mask is. On a Windows PC you type the command 'ipconfig' in a 'DOS box' (this is opened by typing 'cmd' from the start menu). You will then see the IP address of the PC and the subnet mask. Choose a higher address within the subnet; as an example, when the subnet mask is 255.255.255.0 you could use .240 as the last number for the IP address. This address won't be in use, unless you have hundreds of devices connected in your subnet. Once the router has spotted that this address is in use, it won't allocate this address to other devices. The DHCP server in the router can also be configured so that it won't dynamically allocate all addresses. The author has configured his router so that the DHCP server will only allocate addresses from .10 to .100. The other addresses can then be statically configured in the peripheral devices.
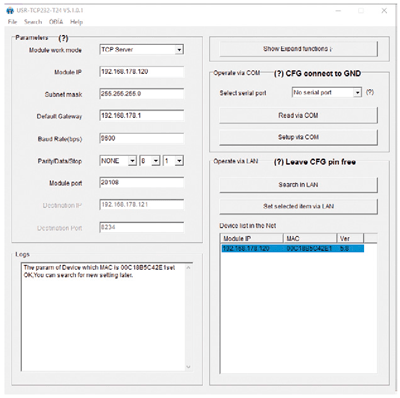
Figure 2. Screen dump of the ‘USR-TCP232-T24 V5.1.0.1.exe’ program, with the settings shown that are used to configure the module
You can use any port number you like. 'Logical' choices are '23' (the port for Telnet), '2000' (the port used by default by the RN-171) or '20108' (the default port of the USR-TCP232-T module).
In the following example the subnet mask is '255.255.255.0' and the module gets the IP address of 192.168.178.120 with a port at 20108. The gateway (router) has the address 192.168.178.1. The MAC address is different for every module, so the MAC address used here is just an example. Follow these steps:
- Connect the USR-TCP232-T with an Ethernet cable to the network to which the PC with the configuration program is also connected.
- Connect the power to the module. Don't use the configuration pin on the module (don't connect it to anything at all).
- Start the configuration program on the PC (USR-TCP232-T24 V5.1.0.1.exe).
- Click on 'Search in LAN'. The program will then find the module on the network.
- The module will appear in the 'Device list in the net'. Select the module by clicking on it.
- Select the following settings:
- - Module work mode: TCP server
- - Module IP: 192.168.178.120
- - Subnet mask: 255.255.255.0
- - Default gateway: 192.168.178.1
- - Baud Rate (bps): 9600
- - Parity/Data/Stop: NONE, 8, 1
- - Module port: 20108
- - 'Destination IP' and 'Destination port' are grey and can't be filled in.
- Click on 'Set selected item via LAN'
- The following then appears in the Logs: "The param of Device which MAC is 00C18B5C42E1 set OK, You can search for new setting later."
The module is now ready for use.
Setting up the app
To get the app on an Android phone to connect to the USR-TCP232-T module, we have to select WiFi (in the 'Android I/O board Demo' app, for example) for the setting in 'Connection to Android I/O board' (Figure 3). For the 'WiFi address' and 'WiFi port' you should type in the IP address and the port number of the USR-TCP232-T module. In this case, 'WiFi' should be considered to be 'IP network'.
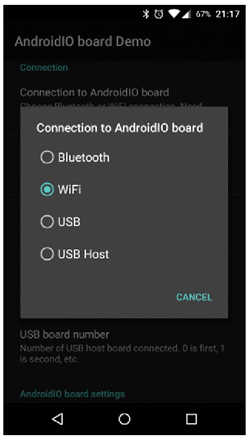
Figure 3. In de demo-app ‘Android IO board Demo’ you have to select Wi-Fi for the setting ‘Connection to Android I/O board’. In this case it
really means ‘IP network’
Controlling several Android I/O boards simultaneously
It is possible to control several Android I/O boards from a single app. This can also include a mix of different communications methods: IP (Wi-Fi and Ethernet), Bluetooth and USB (see Figure 4). There isn't really a limit to the number of Android I/O boards you could control! With IP networks in particular, it's possible to have the Android I/O boards very far apart from each other. Despite this, they can still be controlled and interrogated by a single app.
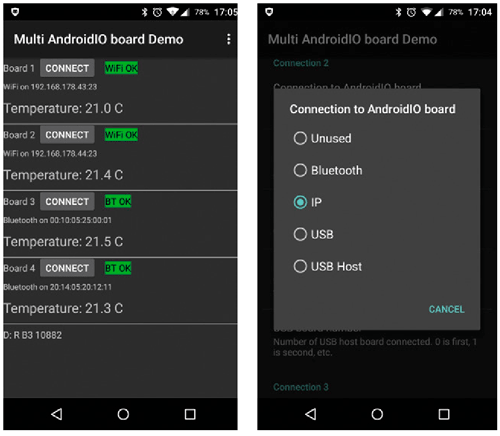
Figure 4. In the ‘Multi AndroidIO board Demo’ you can see that four different boards are connected, where the temperature of each one is shown. For each board you can select a different connection method.
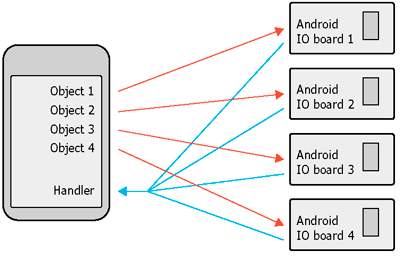
Figure 5. All the data sent back by the Android I/O is processed by a single handler
When multiple Android I/O boards are controlled, a separate object from the IOFunction class has to be created for each board. We can also create an array of objects, if that is easier in your code. For example:
IOBoardFunctions[] IOBoard = new IOBoardFunctions[4];
for (int i=0; i<4; i++) { IOBoard[i] = new IOBoardFunctions(); }
The choice of object determines which Android I/O board will be used for the initializing of the Android I/O board, making a connection or the transmission of data. For example:
IOBoard[2].initiate(2, hnd, “192.168.178.120”, 23, 1, this);
This ensures that the object IOBoard[2] will be linked to the Android I/O board with the specified IP address and port number. The data sent back from all the different Android I/O boards can be processed by a single handler. The first parameter passed with the .initiate (in this example it is '2'), acts as a channel number. It is included with all data in the '.arg1' field of the Message object [4]. This way the app will know exactly from which Android I/O board the data comes from. The figure below shows this graphically.
There is an accompanying demo app (including source code) with this article, which simultaneously reads the temperature sensors of four Android I/O boards. From the menu you can select the communications method for each of the Android I/O boards independently. The app then reads the temperature sensors once per second.
In the source code you can see exactly how multiple Android I/O boards can be controlled. This code and the apk file can be downloaded from [5].
New version of IOBoardFunctions
With the demo app is a new version of IOBoardFunctions, the class containing all the libraries for controlling the Android I/O board from Android. There are several improvements in this version:
All IOBoardFunctions are now in a single file, instead of five files. This makes it easier to use the IOBoardFunctions in your own project.
You can now change the IP address without having to close the app. In the app you can even change the communications method, from IP to USB or Bluetooth, for example.
The number of different '.initiate' functions has been streamlined. There is now a single function for apps that offers all of the communications methods, as well as separate functions for each of the communications methods (Bluetooth, IP, USB Accessory and USB Host).
A detailed explanation can be found at the start of the file IOBoardFunctions.java.
Web Links
[1] Product page: www.usriot.com/Product/20
[2] Manual for the USR-TCP232-T: www.usriot.com/download/ T24//USR-TCP232-T24-EN%20V3.2.5.pdf
[3] Configuration software: www.usriot.com/download/soft-ware/USR-TCP232-T24V5.1.1.20.rar
[4] Description of the Message class: http://developer.android. com/reference/android/os/Message.html
[5] www.elektormagazine.com/150804
Author: Elbert Jan van Veldhuizen (The Netherlands)
